What Works — and What’s Overkill
Humidity is invisible. Comfort problems are not.
If your home feels sticky, clammy, dry, or just a little “off,” measuring humidity is the fastest way to stop guessing and start fixing the right problem.
This guide explains how to measure humidity in a real house. Not a lab. Not a showroom. A normal home with doors opening, showers running, and weather changing outside.
Inside, you’ll learn:
- The indoor humidity range most homes should maintain
- Where to place sensors so readings actually represent the room
- How long to watch humidity before drawing conclusions
- Which tools provide useful information without turning your home into a science project
Some tools help you make decisions.
Others mostly make charts.
Free Home Humidity Tracking Sheet
If you want to see patterns clearly, write the numbers down for a few days.
Track:
- Morning RH
- Evening RH
- Room location
- Outdoor weather
- Notes (rain, windows open, HVAC use)
A few days of readings usually reveal humidity problems quickly.
Download the Home Humidity Tracking Sheet (PDF) to track your readings
How to Measure Humidity So the Numbers Mean Something
This is where many homeowners accidentally sabotage their readings.
Good placement matters more than expensive equipment. A simple meter placed correctly will usually tell you far more than an advanced device placed poorly.
The goal is to measure the air people actually live in, not the quirks of walls, windows, or HVAC vents.
The Only Number That Matters
(Most of the Time)
For homeowners, the number that actually affects comfort is relative humidity (RH).
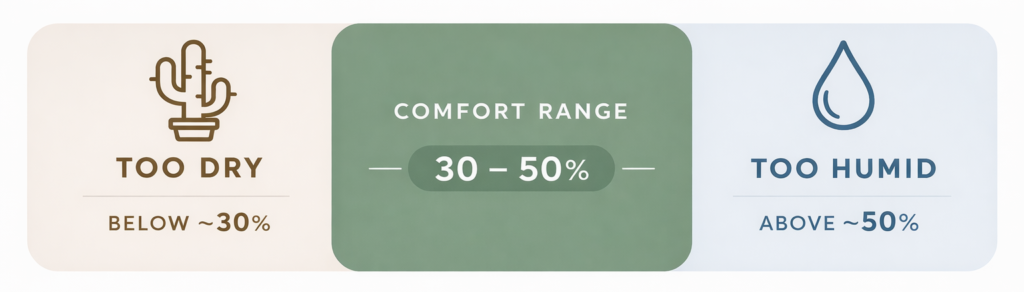
Most homes feel comfortable when indoor humidity stays somewhere between 30% and 50% RH. Short-term swings are normal, but problems usually appear when humidity stays outside that range for long periods.
You do not need laboratory precision. What you need are readings that are consistent enough to reveal patterns.
A meter that reads 42% today and 47% tomorrow is telling you something useful about how your home behaves.
A meter promising “scientific accuracy” rarely provides extra insight into real-world comfort.
Typical Indoor Humidity Comfort Ranges
Below ~30% RH
Dry air often feels irritating or uncomfortable.
30–50% RH
Comfort range for most residential homes.
Above ~55–60% RH
Air begins to feel muggy and moisture problems become more likely.
Where to Place a Humidity Meter
Humidity meters work best when they are positioned where people normally experience the room.
Good placement is usually:
• about 4–5 feet above the floor
• near the center of the room
• away from supply vents and returns
Meters should not be placed in direct sunlight or immediately next to windows and exterior doors. Those locations are influenced by temperature swings and can produce misleading readings.
Bathrooms and kitchens should generally be avoided unless you are specifically trying to diagnose moisture problems in those rooms.
Humidity near exterior walls often behaves differently than the air in the room. The goal is to measure how the room feels, not what the window frame is doing.
How Many Locations to Measure
Humidity is rarely uniform throughout a house.
The reading on a thermostat often hides what is really happening across different floors.
A simple setup that works well for most homes includes measuring humidity in three areas: the basement or lowest level, the main living space, and the bedroom level.
Those three locations alone usually explain most comfort complaints.
It is common for a basement to stay damp while the upstairs feels dry. A single humidity reading cannot reveal that difference.
Multiple readings, even from simple meters, almost always tell the story much more clearly.
Quick Setup
- One meter in the basement or lowest level
- One meter in the main living space
- One meter on the bedroom level
Checking humidity in these three locations usually explains most comfort complaints.
A single thermostat reading rarely tells the whole story.
Recommended Starting Setup
If you are measuring humidity for the first time, keep it simple.
Use as many meters as you have, but try to place at least one on each level of the house.
Humidity often behaves very differently from floor to floor, so multiple readings reveal patterns that a single meter cannot.
Good starting locations include:
- Basement or lowest level, where moisture often accumulates
- Main living space, where people spend the most time
- Bedroom level, where dryness or discomfort is often noticed first
On upper floors, the most humid areas are usually:
- Bathrooms with showers or tubs
- Kitchens where cooking and dishwashing add moisture
If you have extra meters, placing one near these areas can help you see how quickly humidity spreads through the house after showers or cooking.
The goal is not precision.
The goal is seeing patterns across the home.
Simple digital humidity meters work well for this. Two common low-cost options people use are:
- Basic panel-mount temperature and humidity displays (6 Unit Multi-Pack)
- Small finished digital hygrometers designed for room monitoring
Panel-mount meters are inexpensive and accurate, though they look a little unfinished.
Finished indoor hygrometers are designed for room use and typically have stands or cleaner displays.
Either type works well. What matters most is having readings in multiple locations, not buying the most sophisticated meter available.
Within a day or two, those readings usually make humidity problems obvious.
How Often to Check and For How Long
Do not obsess over minute-by-minute readings.
Humidity usually moves slowly, and the goal is to see patterns rather than chase a perfect number.
For most homes, checking readings morning and evening for a few days is enough to reveal how humidity behaves. If you can leave the meters in place longer, watching readings over a full week often provides a clearer picture.
Seasonal changes matter as well. Humidity in winter can behave very differently from humidity in summer, so it is useful to repeat measurements when the weather shifts or when heating and cooling systems change how the house operates.
What you are really looking for are patterns.
Questions like these usually tell the story:
- Is one floor consistently wetter or drier than the others?
- Does humidity spike after rain?
- Does it drop overnight when temperatures fall?
- Do open windows help or make things worse?
Those answers point to the real solution. The meter simply reveals the pattern.
If readings swing wildly hour to hour, the sensor is usually placed poorly or the device itself is unreliable.
Why Your Thermostat Reading Isn’t Enough
Many homeowners assume their thermostat already tells them everything they need to know about humidity. In reality, most thermostats either do not measure humidity at all or provide a reading that represents only a small slice of the house.
Traditional thermostats measure temperature only. Some newer smart thermostats display relative humidity, but even those readings have limitations. Thermostats are typically installed in hallways, on interior walls, or near return airflow where the HVAC system pulls air back to the furnace or air handler. That location helps the system regulate temperature, but it does not necessarily reflect how humidity behaves throughout the home.
Humidity is rarely uniform from floor to floor. It is common for a basement to sit around 65% RH while an upstairs bedroom drops to 28% RH, yet the thermostat in the hallway quietly reports something like 45% RH. The system is averaging air movement through the house, not revealing the conditions people actually experience in each space.
Portable humidity meters expose those differences immediately. A few simple sensors placed on different levels of the home will often show patterns that a single thermostat reading can never reveal.
Option 1: Small Digital Hygrometers
Best Starting Point
If you only do one thing to measure humidity in your home, start with a small digital hygrometer.
These meters are inexpensive, accurate enough for residential use, and easy to move between rooms. Most homeowners can learn more about how humidity behaves in their house with two or three of these than with a single expensive device.
They respond quickly, run on batteries, and are small enough to place anywhere you want to monitor conditions.
For most homes, placing one meter on each level reveals humidity patterns within a day or two.
Learn more:
Best Hygrometers for Home Humidity Monitoring →
Just Want a Simple Meter?
Most homeowners start with a small digital hygrometer. They are inexpensive, easy to move between rooms, and accurate enough to understand how humidity behaves in your home. A simple multi-pack works well because you can place one meter on each floor and see how conditions vary.
Recommended starting options:
• Basic indoor hygrometer (single meter that records daily min/max)
• Multi-pack room hygrometers for whole-home monitoring
Option 2: Smart Home Humidity Sensors
Convenient but Not Necessary
If your home already uses a smart thermostat or automation system, humidity sensors can add useful monitoring features.
These systems can log long-term trends and send alerts when humidity drifts outside a comfortable range. Some smart thermostats can also control whole-home humidifiers or dehumidifiers when wired correctly.
The convenience is helpful, but the additional complexity is not necessary if your goal is simply to understand humidity levels in your home.
Learn more:
Using Smart Thermostats to Monitor Humidity →
Option 3: Indoor–Outdoor Weather Stations
Helpful for Understanding Weather Effects
Weather stations combine indoor humidity readings with outdoor conditions. This helps homeowners understand how outdoor weather influences indoor moisture levels.
Seeing both numbers at the same time often explains why humidity rises after rain or why dry winter air affects indoor comfort.
These systems provide context rather than higher measurement accuracy, but that context can make humidity behavior much easier to interpret.
Learn more:
Indoor vs Outdoor Humidity: What the Numbers Mean →
What You Do Not Need
Homeowners often spend money on instruments that were never intended for residential use.
For diagnosing humidity in a house, you do not need specialized equipment.
Tools commonly marketed to professionals — such as psychrometers, industrial moisture probes, or dew-point meters — are designed for technical environments and usually require calibration, training, or detailed interpretation.
You also do not need instruments that require complicated setup or manuals thicker than a pamphlet.
A few simple humidity meters placed in the right locations will almost always tell you more about your home than a single expensive device.
Reality Check
Humidity problems are rarely uniform throughout a house.
A basement can be damp while the upstairs feels dry. A bathroom may spike after showers while the rest of the home stays comfortable.
That is why a single reading from a thermostat or one sensor rarely tells the whole story.
Multiple simple meters, placed on different floors, usually reveal patterns quickly. Once you can see those patterns, the cause of the problem often becomes much easier to understand.
Once You Know Your Numbers
Once you know your indoor humidity levels, the next step is understanding what those numbers mean.
If readings consistently stay above about 55–60% RH, your home may be holding excess moisture. In that case, the next step is understanding whether a dehumidifier can help. See Do I Need a Dehumidifier for My Home.
If readings regularly fall below about 30% RH, dry air may be the source of the discomfort. In that case, review Do I Need a Humidifier for My Home to see when humidification actually makes sense.
Measuring humidity does not fix the problem by itself.
But it prevents you from fixing the wrong one.